There are many reasons to reinstall hyperion prducts when you get with a trouble.
The steps:
1. Stop all of hyperion services
2. Run uninstall Hyperion
3. Delete the Hyperion registries, this is very important, you cannot just simple run reinstall without clear the Hyperion registries.
regedit -> delete all of the entries inside Hyperion Solution, and other 2 hyperion items below Oracle
4. Delete all of the related Hyperion Environment Variables by right click Computer. For the path variable, you can edit it and delete all hyperion related entries, but don;t delete the entries for other applications.
5. Then you can go ahead to reinstall.
Have a fun!
5/12/10
install Hyperion 11.1.2 in Windows 2008
The steps of Install Hyperion 11.1.2 in Windows 2008 64bit:
1. Install the IIS service in windows OS
2. Install Oracle database(or other database), select shared mode instead of dedicated mode. By default, the dedicated mode will allow 150 process thread simultaneously, and you is not enough for Hyperion services.
Create an Oracle user name for the installation.
3. For Oracle, you just need to create one database instance, no need to create many databases, but you can create many user schemas. In a word, Oracle, one database,multi user schemas.
4. For SQL database, you can create many databases but one user id. In a word, SQL, one user id, multi databases.
5. Download Hyperion 64 bit software, extracted them in one folder
6. For the previous version Hyperion 11.1.1.3, you may install weblogic before install Hyperion products. And in Hyperion 11.1.1.3, weblogic 64bit has to be configured manully. In Hyperion 11.1.1.3, you may use weblogic 32bit on 64bit windows machine.
7. For the new Hyperion 11.1.2 version, no need to install weblogic before install hyperion, because weblogic has become a part of foundation services, and it will be installed by default.
8. Run as administrator to the install hyperion, after installation, no need to reboot computer
9. After installation go to configure shared service first, after it is successful,then confirgure all of others.
4/12/10
Start remote Hyperion in sequence
REM Remote Start Hyperion Service
REM Description: for remote service, use
REM sc \\machine start
@ECHO OFF
REM -------STARTING Hyperion Services----------------------------
REM -------HyperionRMIRegistry--------------------------------------
sc \\machine start "Hyperion RMI Registry"
waitfor NONEXISTINGSIGNAL /T 5
REM -------Hyperion OpenLDAP--------------------------------------
sc \\machine start "Hyperion Foundation OpenLDAP"
waitfor NONEXISTINGSIGNAL /T 5
REM -------Hyperion Shared Services Web application-----------------
sc \\machine start HyS9SharedServices
waitfor NONEXISTINGSIGNAL /T 30
REM ------starting Essbase Server ----------
sc \\machine start "Hyperion Essbase Services 11.1.1 - hypservice_1"
waitfor NONEXISTINGSIGNAL /T 5
REM ------starting Essbase ADM ----------
sc \\machine start "Hyperion Administration Services - Web Application"
waitfor NONEXISTINGSIGNAL /T 5
REM --------starting integration -------
sc \\machine start "Hyperion Integration Services"
waitfor NONEXISTINGSIGNAL /T 5
REM -------Hyperion Provider Services Web application----------------
sc \\machine start HyS9aps
waitfor NONEXISTINGSIGNAL /T 5
REM --------starting workspace-----------------
sc \\machine start "Hyperion Workspace - Web Application"
waitfor NONEXISTINGSIGNAL /T 5
sc \\machine start "Hyperion Workspace - Agent Service"
waitfor NONEXISTINGSIGNAL /T 5
sc \\machine start "Hyperion Annotation Server"
waitfor NONEXISTINGSIGNAL /T 5
REM -------------starting Planning-------
sc \\machine start "Hyperion Planning - Web Application"
waitfor NONEXISTINGSIGNAL /T 10
REM --------starting EPMA Core Services-------------
REM ---the next 4 services will be started by Process manager automatically---
REM Hyperion EPM Architect - .Net JNI Bridge
REM Hyperion EPM Architect - Engine Manager
REM Hyperion EPM Architect - Event Manager
REM Hyperion EPM Architect - Job Manager
sc \\machine start "Hyperion EPM Architect - Process Manager"
waitfor NONEXISTINGSIGNAL /T 60
REM --------starting EPMA Architect-------------
sc \\machine start "Hyperion EPM Architect - Web Application"
REM waitfor NONEXISTINGSIGNAL /T 10
sc \\machine start "Hyperion EPM Architect Data Synchronization - Web Application"
REM waitfor NONEXISTINGSIGNAL /T 10
sc \\machine start "Hyperion CALC Manager - Web Application"
REM waitfor NONEXISTINGSIGNAL /T 10
REM -------Hyperion Financial Reporting Java RMI Registry------------------
sc \\machine start HyS9FRRMI
waitfor NONEXISTINGSIGNAL /T 2
REM -------Hyperion Financial Reporting Print Server----------------------------
sc \\machine start HyS9FRPrint
waitfor NONEXISTINGSIGNAL /T 2
REM -------Hyperion Financial Reporting Report Server---------------------------
sc \\machine start HyS9FRReport
waitfor NONEXISTINGSIGNAL /T 2
REM -------Hyperion Financial Reporting Scheduler Server------------------------
sc \\machine start HyS9FRSched
waitfor NONEXISTINGSIGNAL /T 2
REM -------Hyperion Financial Reporting Web application-------------------------
sc \\machine start HyS9FRWeb
waitfor NONEXISTINGSIGNAL /T 5
REM -------starting web analysis ------------------
sc \\machine start "Hyperion Web Analysis - Web Application"
REM waitfor NONEXISTINGSIGNAL /T 5
REM -------Hyperion Workspace Web application(Weblogic is included already---------------------------
REM -------The registry path refers this service to start weblogic -------------------
sc \\machine start HyS9Workspace
waitfor NONEXISTINGSIGNAL /T 20
REM ALL DONE!
waitfor NONEXISTINGSIGNAL /T 30
4/3/10
Cannot start essmsh?
essmsh cannot be started from command line, if this happens, do the next steps:
1.
set path = C:\Hyperion\products\Essbase\EssbaseClient\bin
2. Add C:\Hyperion\products\Essbase\EssbaseClient\bin to the Path environment variable as follows
 3. Restart computer
1.
set path = C:\Hyperion\products\Essbase\EssbaseClient\bin
2. Add C:\Hyperion\products\Essbase\EssbaseClient\bin to the Path environment variable as follows

3/30/10
ODI configuration with SQL 2005 server
1. Download Oracle Data Indicator Software from http://edelivery.oracle.com/
2. Check the Windows system, to see if it is 64 bit or 32 bit.
3. Download Java JDK 1.6 the Java JDK is installed C:\Program Files\Java\jdk1.6.0_18
4. Java Environment Variable setting, set ODI_JAVA_HOME = C:\Program Files\Java\jdk1.6.0_18

5. Install the ODI software in Windows system
6. Download Java JDBC driver for SQL Server, sqljdbc_2.0.1803.100_enu.exe, extract it and copy the files to C:\OraHome_1\oracledi\drivers folder
7. Delete the sqljdbc.jar but keep the sqljdbc4.jar file, because the sqljdbc4.jar is the correct driver file for ODI SQL JDBC linksqljdbc4.jar and sqljdbc.jar.
Note:
For JDK5 – use sqljdbc.jar
for JDK6 – use sqljdbc4.jar
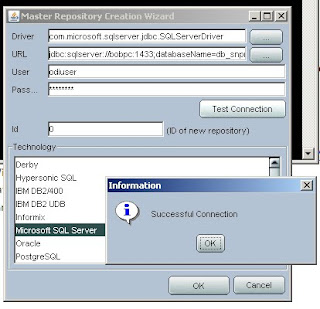
8. Create ODI Master Repository using Repository Management
2. Check the Windows system, to see if it is 64 bit or 32 bit.
3. Download Java JDK 1.6 the Java JDK is installed C:\Program Files\Java\jdk1.6.0_18
4. Java Environment Variable setting, set ODI_JAVA_HOME = C:\Program Files\Java\jdk1.6.0_18

5. Install the ODI software in Windows system
6. Download Java JDBC driver for SQL Server, sqljdbc_2.0.1803.100_enu.exe, extract it and copy the files to C:\OraHome_1\oracledi\drivers folder
7. Delete the sqljdbc.jar but keep the sqljdbc4.jar file, because the sqljdbc4.jar is the correct driver file for ODI SQL JDBC linksqljdbc4.jar and sqljdbc.jar.
Note:
For JDK5 – use sqljdbc.jar
for JDK6 – use sqljdbc4.jar
8. Create ODI Master Repository using Repository Management

3/18/10
SQL Server file system backup and recovery method
1. ntbackup command to backup the SQL file system
2. reg command to backup the windows registry
Important: when we recover file system from file system backup, first DELETE the files that have been damaged or maybe damaged, otherwise, the existing file will NOT be recoverred from the backup, this is very important!
Example: Suppose, the SQL Master database is damaged, and the SQL server cannot be started. Here is the steps: Open the C:\Program Files\Microsoft SQL Server\MSSQL.1\MSSQL\Data folder, for all of the files that have new time stamps after the existing backup time, move them to a temp folder, or simply delete all of the files in C:\Program Files\Microsoft SQL Server\MSSQL.1\MSSQL\Data folder. This will force a clean recovery. And then,use ntbackup command line to recover the C:\Program Files\Microsoft SQL Server\MSSQL.1\MSSQL\Data folder from the backup.
-----------
Below is the script for backup the SQL file systems:
@ECHO OFF
REM --------------------------------------------------------------------------------
REM Procedure Name: BackupSQLFileSystem.bat
REM Created By: Bob Wang
REM Creation Date: 17-Mar-2010
REM Functionality: 1. backup SQL File System
REM 2. backup hKEY_LOCAL_MACHINE registries
REM
REM Modification History:
REM ---------------------------------------------------------------------------------
@for /f "Tokens=1-4 Delims=/ " %%i in ('date /t') do @set dt=%%i-%%j-%%k-%%l
@for /f "Tokens=1" %%i in ('time /t') do @set tm=-%%i
@set tm=%tm::=-%
@set dtt=%dt%%tm%
@echo SQL file system full backup set: %dtt%.
@echo Please wait...
@C:\WINDOWS\system32\ntbackup.exe backup "@C:\download\GoLive\SQL Server\set_SQL.bks" /a /d "Backup %dtt%" /v:no /r:no /rs:no /hc:off /m copy /j "%dtt%" /l:s /f "C:\SQL Server Backup\SQLFileSystemBackup %dtt%.bkf"
@ECHO eXPORT HKEY_LOCAL_MACHINE registries ..
@C:\WINDOWS\system32\REG.exe EXPORT HKLM "C:\SQL Server Backup\HKEY_LOCAL_MACHINE_Backup %dtt%.reg"
-----------------------------
The improved code:
@ECHO OFF
REM --------------------------------------------------------------------------------
REM Procedure Name: BackupSQLFileSystem.bat
REM Created By: Bob Wang
REM Creation Date: 17-Mar-2010
REM Functionality: 1. backup SQL File System
REM 2. backup hKEY_LOCAL_MACHINE registries
REM
REM Modification History:
REM ---------------------------------------------------------------------------------
@set path1="C:\WINDOWS\system32\ntbackup.exe"
@set path2="@C:\download\GoLive\SQL Server\set_SQL.bks"
@set path3="C:\SQL Server Backup\SQLFileSystemBackup %dtt%.bkf"
@set path4="C:\SQL Server Backup\HKEY_LOCAL_MACHINE_Backup %dtt%.reg"
@for /f "Tokens=1-4 Delims=/ " %%i in ('date /t') do @set dt=%%i-%%j-%%k-%%l
@for /f "Tokens=1" %%i in ('time /t') do @set tm=-%%i
@set tm=%tm::=-%
@set dtt=%dt%%tm%
@echo SQL file system full backup set: %dtt%.
@echo Please wait...
@%path1% backup %path2% /a /d "Backup %dtt%" /v:no /r:no /rs:no /hc:off /m copy /j "%dtt%" /l:s /f %path3%
@ECHO eXPORT HKEY_LOCAL_MACHINE registries ..
@C:\WINDOWS\system32\REG.exe EXPORT HKLM %path4%
SQL backup Script
DECLARE @name VARCHAR(50) -- database name
DECLARE @path VARCHAR(256) -- path for backup files
DECLARE @fileName VARCHAR(256) -- filename for backup
DECLARE @fileDate VARCHAR(20) -- used for file name
SET @path = 'C:\Backup\'
SELECT @fileDate = CONVERT(VARCHAR(20),GETDATE(),112)
DECLARE db_cursor CURSOR FOR
SELECT name
FROM master.dbo.sysdatabases
WHERE name NOT IN ('master','model','msdb','tempdb')
OPEN db_cursor
FETCH NEXT FROM db_cursor INTO @name
WHILE @@FETCH_STATUS = 0
BEGIN
SET @fileName = @path + @name + '_' + @fileDate + '.BAK'
BACKUP DATABASE @name TO DISK = @fileName
FETCH NEXT FROM db_cursor INTO @name
END
CLOSE db_cursor
DEALLOCATE db_cursor
3/16/10
Map IP address to Host Name
You can ping the server IP address, but cannot ping the host name of the server.
Solution: add record in the client host file. The host file is located at \windows\system32\drivers\etc\*
----------------
Detail:
You are having a Name Resolution issue. The internet uses a DNS service to
map names to ip-addresses. However, those are Public ip-addresses, not private
Lan addresses. To solve this Windows uses multiple techniques:
a Master Browser to record systems
the host file
If you have dependable ip-addresses (ie: static addresses or MAC enforced ip assignments),
then you can enter the mapping into your host file (this is the technique I use).
The host file is located at \windows\system32\drivers\etc\* and the format of the entry is
ip-address (one or more spaces) theSystemName
The host file allows any system to be included, private (eg your desktop) and public
(eg www.google.com) -- but make sure you get the ip-address correct!
Apachy Web Server Plug-in folder
In the process of configuration, the environment is: SQL 2005, Windows 2003, the installed component is: Weblogic 9.2, EPMA, Essbase, Planning, SmartView. when I configure the web server, I select Apachy, and the next screen ask for the web server plug in folder, "Enter the directory where the plug-ins(mod_wl_20.so) are installed".
There are 2 ways to find the directory:
Way One:
1. Download and apply the web server plug-in patch #7825156 from OracleMetaLink as per the instructions below:
• Select the Patches and Updates tab after logging in to OracleMetaLink.
• Click Simple Search.
• In the Search By field, select Patch Number from the list.
• Enter the patch number. The patch number may be different for different product releases and platforms.
• Select the platform (or choose generic as applicable)
• Click Go.
• Click Download to download the patch.
Way Two:
When installed weblogic, select custom install and select "web server plugins", this will install the files you need in the BEA installation.
3/11/10
Hyperion - Windows Backup List
File System Backup:
Regular file system backups are recommended for these EPM System products:
. Shared Services (cold backup)
. Dashboard Development Services
. Oracle Hyperion EPM Architect, Fusion Edition
. Oracle Hyperion Performance Scorecard, Fusion Edition
. Planning
. Reporting and Analysis
File system items that are commonly backed up:
. Hyperion home directory (to back up all installed products), especially these subdirectories:
. HYPERION_HOME/common/config/9.5.0.0 (to back up the configuration and reconfiguration settings written to the Shared Services Registry)
. For Oracle Enterprise Performance Management Workspace, Fusion Editionmodules,
. EPM Workspace search index files in HYPERION_HOME/common/config/9.5.0.0/wsearch
. HYPERION_HOME/products/specific_product
. HYPERION_HOME/deployments (EPM System Web application deployment subdirectory)
Note: This item applies only to products that require a Web application server.
. Product applications and application data
. In Windows environments:
. Windows registry: HKEY_LOCAL_MACHINE and all of its subkeys
. Windows Environment Varables
----------
Database Backup
l Databases that store EPM System application data
l Shared Services databases:
m Relational database for Shared Services
This database contains Shared Services Registry, which stores most product
configuration settings.
See “Backing Up the Shared Services Relational Database ” on page 17.
m OpenLDAP database, if OpenLDAP is used as the Shared Services Native Directory
m Oracle Internet Directory database if Oracle Internet Directory is used as the Shared
Services Native Directory
See the Oracle Internet Directory documentation (http://download.oracle.com/docs/
cd/B28196_01/idmanage.1014/b15991.pdf).
Preparing These backups are recommended:
m Physical full backup immediately after installation and configuration
m Weekly cold backup with complete backup of files under HYPERION_HOME/
products/Foundation/openLDAP
m Daily hot backups of transaction logs after OpenLDAP checkpoints are run
The transactions logs are in HYPERION_HOME/products/Foundation/openLDAP/
var/openldap-data/log.000000000x. A backup copies the logs to the logfiles
(Windows) or LogFiles (UNIX) subfolder of the backup folder. Examples: (UNIX)
o Windows—Running backup.bat c:/temp/bck copies the logs to c:/temp/
bck/logfiles/log.000000000x.
o UNIX—Running backup.sh c:/temp/bck copies the logs to c:/temp/bck/
LogFiles/log.000000000x.
Windows:Export registries using command line
c:\reg export HKLM\Software\7-zip c:\7-zip.reg
This will export the below key for 7-zip:

This will export the below key for 7-zip:

Windows: stop and start services from the command line
net stop
net start
A full list of the exact services is found in the registry (run regedit.exe) under the HKEY_LOCAL_MACHINE\SYSTEM\CurrentControlSet\Services key.
Alternatively, you can perform the stop and start using the name that is showed in the Services Control Panel applet by putting the name in quotes, i.e.
net stop ""
net start ""
net start
A full list of the exact services is found in the registry (run regedit.exe) under the HKEY_LOCAL_MACHINE\SYSTEM\CurrentControlSet\Services key.
Alternatively, you can perform the stop and start using the name that is showed in the Services Control Panel applet by putting the name in quotes, i.e.
net stop "
net start "
3/10/10
The powerful NTbackup command line
For Hyperion, we need to make complete cold backup for many important folders, for windows system, the ntbackup command give us a simple but powerful way to make a backup.
-----------------------
A sample NTbackup script, with the current date/time in the filename and backup label:
If you ever tried to automate NTbackup, you probably got it up and running, scheduled every day or week, but then noticed over time that the date and time labels that go on the backup file are the current date/time of when you created the backup set. This useful shell script provides a more intelligent solution by parsing the current date and time and inserting them into the filename and backup label. This makes the backups much easier to identify in the case where you need to restore some files.
The script below makes a full backup (not differential) of the files specified in the backup set.bks. To get the set.bks, in command line, input ntbackup, press enter key, and select backup wizard, make a select as below and saved the file as set.bks.

It doesn't verify the backup, and lastly it sends a copy of the backup file to another computer (just in case), that's what the last 3 lines are for. You can obviously remove this step if you don't want it.
@for /f "Tokens=1-4 Delims=/ " %%i in ('date /t') do @set dt=%%i-%%j-%%k-%%l
@for /f "Tokens=1" %%i in ('time /t') do @set tm=-%%i
@set tm=%tm::=-%
@set dtt=%dt%%tm%
@echo Copying backup set: %dtt%.
@echo Please wait...
@C:\WINDOWS\system32\ntbackup.exe backup "@C:\Documents and Settings\bob\Local Settings\Application Data\Microsoft\Windows NT\NTBackup\data\set.bks" /a /d "Backup %dtt%" /v:no /r:no /rs:no /hc:off /m copy /j "%dtt%" /l:s /f "C:\test\Backup %dtt%.bkf"
@echo Sending backup file to Server2. Please wait...
@echo not used this time: @xcopy "@G:\Auto Backups\Backup %dtt%.bkf" "@\\Server2\Backup_Copy" /Y
3/4/10
EPMA compare to Classic Planning
The comparison between EPMA and Classic Planning method:
1) The architecture difference between EPMA and Classic:
For Classic Planning applications, databases are created and maintained within Planning. For Performance Management Architect applications, applications are created in Performance Management Architect and deployed to Planning.
2). The advantages of EPMA over Classic in the next case:
If there are many application and we want to centrally develop everything, EPMA is bettter. Besides, EPMA application can use the existing dimensions and template, and easier to develop a new application, the dimension library makes the dimension reusable. EPMA is easier to manage hierarchies through an advanced gui compared to classic, we can share dimensions across not just planning applications but HFM.
3). The great difference in data loading performance
For classic planning, we can use ODI and outline loader for data transferring. The outline loader and ODI utility uses much of the core engine, the data loading is very fast. ODI does not work directly with EPMA and the current adaptors are aimed at classic planning. EPMA may improve over time but now it is not efficient for data loading and very slow. For example, to load a dimension with about 1000 members, EMPA may use 1-3 hours while outline loader and ODI may just use 10 mins only.
4). Calculation Manager and Business Rule Module:
Calculation Manager can only works with EPMA in the olde Hyperion versions, and that used to be a reason to select EPMA. Calculation Manager is more convenient in building the business rules than the business rule module. In version 11.1.1.3, hyperion product is improved, and classic planning can also use Calculation Manager as an important method to create the business rule.
5. The compatibility with ODI:
ODI does not work directly with EPMA and the current adaptors are aimed at classic planning. We can transfer data with ODI to Essbase(the Essbase have the Planning Data) directly using Essbase Adaptor, and don't have to use planning adaptor.
6. Shared Service:
EPMA and classic planning both works with Shared Service.
7. Migration From Classic to EPMA is simple:
It is simple to migrate from classic planning to EPMA planning, there is existing method to migrate Classic Planning Application to EPMA. This give us a choice for the future, because the hyperion product is in improvement, the current defects for EPMA may be solved in the later versions. And the client company may also have a business reason to use EPMA in the future.
2/28/10
Installing EPM System Products in a Distributed Environment
You typically install EPM System products in a distributed environment. The number of computers you need depends on several factors, including:
l The size of the applications
l The number of users
l The frequency of concurrent use by multiple users
l Any requirements your organization has for high availability
l Your organization's security requirements
EPM System Installer simplifies the task of installing components in a distributed computing environment. You can install, configure, and validate any components you want on any computer.
RAM - Hyperion Installation
C:\download\E12825_01\E12825_01\epm.111\epm_install_start_here.pdf
When deploying all EPM System products to Oracle WebLogic Server on one machine, 6
GB of RAM is recommended
When EPM System components will be deployed to Oracle Application Server in a distributed
environment, all of the Oracle Application Server instances must:
l Reside in the same cluster topology
l Use a single instance of the Application Server Control (the Administration OC4J instance)
to manage all the instances in the cluster
l Use a supported Web server to route requests to the J2EE containers (OC4J instances)
Prepare Environment for Hyperion Installation
1.Prepare a DB
2.Prepare a Web Application Server
3.Prepare Web Server
4.Prepare Web Browser
2.Prepare a Web Application Server
3.Prepare Web Server
4.Prepare Web Browser
SSL - Secure Socket Layer
Secure Sockets Layer, a protocol developed by Netscape for transmitting private documents via the Internet. SSL uses a cryptographic system that uses two keys to encrypt data − a public key known to everyone and a private or secret key known only to the recipient of the message. Both Netscape Navigator and Internet Explorer support SSL, and many Web sites use the protocol to obtain confidential user information, such as credit card numbers. By convention, URLs that require an SSL connection start with https: instead of http:.
Another protocol for transmitting data securely over the World Wide Web is Secure HTTP (S-HTTP). Whereas SSL creates a secure connection between a client and a server, over which any amount of data can be sent securely, S-HTTP is designed to transmit individual messages securely. SSL and S-HTTP, therefore, can be seen as complementary rather than competing technologies. Both protocols have been approved by the Internet Engineering Task Force (IETF) as a standard.
Another protocol for transmitting data securely over the World Wide Web is Secure HTTP (S-HTTP). Whereas SSL creates a secure connection between a client and a server, over which any amount of data can be sent securely, S-HTTP is designed to transmit individual messages securely. SSL and S-HTTP, therefore, can be seen as complementary rather than competing technologies. Both protocols have been approved by the Internet Engineering Task Force (IETF) as a standard.
2/26/10
Should I use SSL for Hyperion Installation?
I am going to install Hyperion products for a client, should I enable SSL option? If I enable SSL, the confguration become not successful, if I don't enable SSL, the configuration is successful. Should I do something before I enable SSL during installation? Is it very important to enable SSL? If I don't enable SSL, after installation and configuration, will remote people can see and login the workspace without error?
--------------------
SSL is secure-socket-layer. The EPM Security guide mentions the steps to enable this properly. It is not needed to have Hyperion function properly.
--------------------
SSL is secure-socket-layer. The EPM Security guide mentions the steps to enable this properly. It is not needed to have Hyperion function properly.
- It is required if the client wants all communications between the EPM system encrypted.
- It is a more complex configuration to setup SSL. Some companies use load balancers in front of EPM to encrypt all traffic.
John A. Booth
------------------------------------
If I don't enable SSL, after installation and configuration, will remote people can see and login the workspace without error?
------------------------------------
hi,
1. People can login workspace , even if you dont enable SSL.But the point is , its a protocol which provides security for communication over inernet/network
2. Recently we had done upon client interest,of course we ran into few issues.
3. There are docs available for SSL configuration, one can find it here
file name : Oracle Hyperion Enterprise Performance Management System SSL Configuration Guide Release 11.1.1.3
URL : http://download.oracle.com/docs/cd/E12825_01/nav/portal_1.htm
Sandeep Reddy Enti
HCC
http://hyperionconsultancy.com/
SSL-enable Shared Services
1 Optional: If the CA root certificate you are using is not from a default trusted third-party CA, import the CA root certificate into the cacerts of the JVM. cacerts is in the /lib/security directory within the JRE install directory.
Ensure that you load the CA root certificate into all JREs used by EPM System (application server,EPM System applications, HTTP servers, LDAP servers, etc.). The typical location of the JVM:
l Oracle Application Server: ORACLE_AS_HOME/jdk/jre/lib/security
l WebLogic (you must import CA root certificate into both jRockit and SUN JVMs):
. jRockit: BEA_HOME/jrockitversion_number/jre/lib/security/cacerts
. SUN: BEA_HOME/jdkversion_number/jre/lib/security/cacerts
where version_number identifies the JRE version.
---------------------
To SSL-enable Shared Services on WebLogic:
1 Log on to WebLogic Administration Console.
2 Select Servers > Shared Services (admin).
3 From General, select SSL Listen Port Enabled.
4 Specify the port (for example, 28083) on which Shared Services listens for SSL communication.
5 From Keystore, set up the identity and trust keystore.
If you are not using a root certificate from a trusted third-party CA, verify that your root CA certificate is loaded into the trust keystore and that the server certificate is loaded into your identity keystore.
6 From SSL, set up the key alias, certificate location, and pass phrase.
7 Optional: Click Advanced and set Hostname Verification value to None.
Obtaining and Using Certificates from a CA
Obtaining a certificate from a CA typically involves the following actions:
l Generating a certificate request and sending it to the CA for processing.
l Receiving the digitally signed certificate from the CA.
If the JRE is configured to use your own trusted keystore (and not the default trusted store cacerts), you must load the CA root certificate into your trusted keystore and not into the default trusted store cacerts. To determine whether your JRE is using your own trusted keystore, ensure that the javax.net.ssl.trustStore Java start parameter points to trusted keystore; for example, -
Djavax.net.ssl.trustStore=Absolute_path_to_Trusted_keystore
SSL - Hyperion Installation
You have determined the deployment topology and identified the communication links that are to be secured using SSL. Note that if you SSL-enable the Web server, you must also SSLenable the application server. EPM System products do not support SSL offloading.
You have obtained the required certificates from a Certificate Authority (CA), either a wellknown CA or your own, or created self-signed certificates. You must obtain certificates for Web server, application server, and user directories. Each server that hosts EPM System products requires a separate certificate.
You have obtained the required certificates from a Certificate Authority (CA), either a wellknown CA or your own, or created self-signed certificates. You must obtain certificates for Web server, application server, and user directories. Each server that hosts EPM System products requires a separate certificate.
2/25/10
configure EPM System products
Only 32-bit application servers are supported for auto-deployment.
Choose a method to launch EPM System Configurator:
l On the last page of EPM System Installer, click Configure.
l From the Start menu, select Programs, then Oracle EPM System, then Foundation Services, and then EPM System Configurator.
l Double-click configtool.bat from HYPERION_HOME/common/config/ version_number.
l From a Windows console, change to HYPERION_HOME/common/config/version_number, and then enter startconfigtool.bat -console.
l Create a silent configuration response file. See “Performing Silent Configurations” on page 108.
l On UNIX, change to HYPERION_HOME/common/config/version_number and then type ./configtool.sh.
l On UNIX, change to HYPERION_HOME/common/config/version_number and then type ./configtool.sh —console
Configuring Products in an SSL-Enabled Environment
If you are configuring EPM System products for SSL, configure in this order:
1. Configure Shared Services first. To configure Shared Services, select the Foundation tasks on the Product Selection page of EPM System Configurator: “Common Settings,” “Configure Database,” “Deploy to Application Server.” On the “Common Settings” page, select “Enable SSL for communications.”
2. Set up Shared Services for SSL.
See Oracle Hyperion Enterprise Performance Management System SSL Configuration Guide.
3. Make sure Shared Services is running.
4. Configure the rest of the EPM System products.
5. Set up other EPM System products for SSL.
See Oracle Hyperion Enterprise Performance Management System SSL Configuration Guide.
Prepare a DB - Hyperion Installation Preparation
Before you install and configure most EPM System products, you must create a database using a supported RDBMS (Oracle Database, Microsoft SQL Server, or IBM DB2). For ease of deployment and simplicity, you can use one database repository for all products (with the exceptions noted below). When you configure multiple products at one time using Oracle's Hyperion Enterprise Performance Management System Configurator, one database is configured for all selected products.
Caution! To use a different database for each product, perform the “Configure Database” task separately for each product. In some cases you might want to configure separate databases for products. Consider performance, roll-back procedures for a single application or product, and disaster recovery plans.
The following products and product components require unique databases:
For information about the FDM database, see the Oracle Hyperion Financial Data Quality Management DBA Guide.
The following products and product components require unique databases:
- Performance Management Architect interface data source.
- Extended Analytics for Financial Management and Extended Analytics for Strategic Finance.
- Planning. Each Planning application should have its own repository.
- Performance Scorecard.
- FDM. Use an Oracle Database instance exclusively for FDM.
- Data Relationship Management. See the Oracle Hyperion Data Relationship Management Installation Guide.
AIX - Hyperion Installation Preparation
Prepare the Production Reporting Server:
A C compiler is required to relink the Production Reporting Server executables for all platforms except
Sun Solaris. For the AIX platform, a C++ compiler is required. If you need an installed C++ compiler, you can download the required C++ components from the following locations.
For AIX, go to:
http://www-1.ibm.com/support/docview.wss?uid=swg24001174
No changes to the Production Reporting Server linking scripts are required.
-----------------
Prepare the runtime environment on AIX:
Interactive Reporting, Financial Reporting, Web Analysis, and in some cases Essbase Server require an updated C++ runtime environment version on AIX 5L.
To obtain the update:
A C compiler is required to relink the Production Reporting Server executables for all platforms except
Sun Solaris. For the AIX platform, a C++ compiler is required. If you need an installed C++ compiler, you can download the required C++ components from the following locations.
http://www-1.ibm.com/support/docview.wss?uid=swg24001174
No changes to the Production Reporting Server linking scripts are required.
-----------------
Prepare the runtime environment on AIX:
Interactive Reporting, Financial Reporting, Web Analysis, and in some cases Essbase Server require an updated C++ runtime environment version on AIX 5L.
To obtain the update:
- Go to the IBM technical support website (https://techsupport.services.ibm.com/.)
- Search for the PTF number (U489780) or the fileset (xlC.aix50.rte.6.0.0.7) and download the file
SSL and WebServer - Hyperion Installation
For automatic deployment, the Web server must reside on the same machine where EPM Workspace will be deployed.
If you are using secure communication, ensure availability of SSL certificates for all components.
Ensure that Web application servers are available for EPM System product deployment. The application server and the product that you are deploying must be installed on the same computer. Web server should be installed BEFROE you install the Hyperion products.
EPM Workspace and the application being integrated must be deployed to the same Web application server type. For example, if EPM Workspace is deployed to Oracle WebLogic Server, Performance Management Architect must also be deployed to WebLogic Server.
Resolve potential firewall - Hyperion Installation Preparation
For example, in some cases, Essbase Integration Services Console is used on a client computer that is outside the network firewall, and the console requires access to Integration Server and Essbase Server, which are located inside the network firewall. In these cases, you must log on to Essbase Server with a name that both the client system and Integration Server can use to communicate with Essbase Server.
Problems arise when you attempt to log on using the external IP address of the computer running Essbase Server. Integration Server cannot use the external IP address to communicate with the computer running Essbase Server because both Essbase Server and Integration Server are inside the firewall. Administrators can solve this problem by defining an alias for the Essbase Server computer that is usable from both sides of the firewall.
Problems arise when you attempt to log on using the external IP address of the computer running Essbase Server. Integration Server cannot use the external IP address to communicate with the computer running Essbase Server because both Essbase Server and Integration Server are inside the firewall. Administrators can solve this problem by defining an alias for the Essbase Server computer that is usable from both sides of the firewall.
UNIX - Hyperion Products Installation Preparation
l For UNIX systems, create a login to install, configure, and run EPM System products. The account that is used to install EPM System products must have Read, Write, and Execute permissions on $HYPERION_HOME.
Oracle recommends that you do not install, configure, and run EPM System products using the root user.
Oracle recommends that you do not install, configure, and run EPM System products using the root user.
- For each UNIX server, prepare a user account (not the root). Install and configure as the same user for all EPM System products.
- If you are using Oracle Application Server, you must install and configure EPM System products using the same user you used to install Oracle Application Server.
- If you have installed any other Oracle products, the user that will be installing EPM System products must be part of the same group as the user who installed the other Oracle products. For example, both users must be part of oinstall. If you are upgrading EPM System products, follow this requirement even if you used multiple users to install components in previous releases.
2/24/10
WebLogic cluster
A WebLogic cluster is a collection of WebLogic Server instances that work together to provide a reliable, scalable environment for your applications. WebLogic Server clusters increase reliability by supporting failover; WebLogic automatically switchs requests and processing to a redundant server upon the failure or abnormal termination of the currently-active server. A WebLogic cluster always contains one Administration Server that handles all the administrative duties like, for example, deploying applications and configuring your cluster. You do not deploy applications on the Administration Server, you deploy applications to the Managed Servers that make up the cluster.
Troubleshooting:
Your cluster should not share its multicast port with other applications on your network. If it does, conflicts can result, and you will have problems starting Managed Servers in the cluster, binding objects to the cluster wide JNDI tree, and deploying applications to the cluster. An error like the following in your managed server log is due to a conflicting multicast port/address.
2/14/10
ODI Installation Problem - JDK
After installation the ODI, to run a package in command line, the JDK should be installed.
1. Download JDK from sun website, after installation, for windows, you will find the next folder: C:\Program Files\Java\jdk1.6.0_18
2. Set environment variable:
set ODI_JAVA_HOME =C:\Program Files\Java\jdk1.6.0_18
This seeting will overwrite the default setting. jdk will replace jre
3. For UNIX, the setting is similar, but beed to be very careful to give the WRITE pomission for the related directories.
Oracle Data Indicator - ODI
Oracle Data Integrator employs a powerful declarative design approach to ETL, which separates the declarative rules from the implementation details. Oracle Data Integrator is also based on a unique “E-LT” architecture which eliminates the need for a standalone ETL server and proprietary engine, and instead leverages the inherent power of your RDBMS engines. This combination provides the greatest productivity for both development and maintenance, and the highest performance for the execution of data transformation and validation processes.
Here are the key reasons why more than 500 companies have chosen Oracle Data Integrator for their ETL needs:
• Faster and simpler development and maintenance: The declarative rules driven approach to ETL greatly reduces the learning curve of the product and increases developer productivity while facilitating ongoing maintenance. This approach separates the definition of the processes from their actual implementation, and separates the declarative rules (the “what”) from the data flows (the “how”).
• Data quality firewall: Oracle Data Integrator ensures that faulty data is automatically detected and recycled before insertion in the target application. This is performed without the need for programming, following the data integrity rules and constraints defined both on the target application and in Oracle Data Integrator.
• Better execution performance: traditional ETL software is based on proprietary engines that perform data transformations row by row, thus limiting performance. By implementing an E-LT architecture, based on your existing RDBMS engines and SQL, you are capable of executing data transformations on the target server at a set-based level, giving you much higher performance.
• Simpler and more efficient architecture: the E-LT architecture removes the need for an ETL hub server sitting between the sources and the target server. It utilizes the target server and its RDBMS to perform complex transformations, most of which happen in batch mode when the server is not busy processing end-user queries.
• Platform Independence: Oracle Data Integrator supports all platforms, hardware and OSs with the same software.
• Data Connectivity: Oracle Data Integrator supports all RDBMSs including all leading Data Warehousing platforms such as Teradata, IBM DB2, Netezza, Oracle, Sybase IQ and numerous other technologies such as flat files, ERPs, LDAP, XML.
• Cost-savings: the elimination of the ETL hub server and ETL engine reduces both the initial hardware and software acquisition and maintenance costs. The reduced learning curve and increased developer productivity significantly reduce the overall labor costs of the project, as well as the cost of ongoing enhancements.
2/3/10
MDX - OpeningPeriod,ClosingPeriod,IIF
WITH MEMBER [Measures].[Starting Invemtory] AS
'IIF(IsLeaf([Year].CurrentMember),
[Measures].[Opening Inventory],
([Measures].[Opening Inventory], OpeningPeriod ([Year].Levels(0),[Year].CurrentMember)))'
MEMBER [Measures].[Closing Invemtory] AS
'IIF(IsLeaf([Year].CurrentMember),
[Measures].[Ending Inventory],
([Measures].[Ending Inventory], ClosingPeriod ([Year].Levels(0),[Year].CurrentMember)))'
SELECT
CrossJoin (
{ [100-10] },
{ [Measures].[Starting Invemtory], [Measures].[Closing Invemtory]}
)
ON COLUMNS,
Hierarchize ( [Year].Members,POST )
ON ROWS
FROM Sample.Basic
100-10 100-10
Starting Inventory Closing Inventory
Jan 14587 14039
Feb 14039 13566
Mar 13566 13660
Qtr1 14587 13660
Apr 13660 14172
May 14172 15127
Jun 15127 15580
Qtr2 13660 15580
Jul 15580 14819
Aug 14819 14055
Sep 14055 13424
Qtr3 15580 13424
Oct 13424 13323
Nov 13323 13460
Dec 13460 12915
Qtr4 13424 12915
Year 14587 12915
'IIF(IsLeaf([Year].CurrentMember),
[Measures].[Opening Inventory],
([Measures].[Opening Inventory], OpeningPeriod ([Year].Levels(0),[Year].CurrentMember)))'
MEMBER [Measures].[Closing Invemtory] AS
'IIF(IsLeaf([Year].CurrentMember),
[Measures].[Ending Inventory],
([Measures].[Ending Inventory], ClosingPeriod ([Year].Levels(0),[Year].CurrentMember)))'
SELECT
CrossJoin (
{ [100-10] },
{ [Measures].[Starting Invemtory], [Measures].[Closing Invemtory]}
)
ON COLUMNS,
Hierarchize ( [Year].Members,POST )
ON ROWS
FROM Sample.Basic
100-10 100-10
Starting Inventory Closing Inventory
Jan 14587 14039
Feb 14039 13566
Mar 13566 13660
Qtr1 14587 13660
Apr 13660 14172
May 14172 15127
Jun 15127 15580
Qtr2 13660 15580
Jul 15580 14819
Aug 14819 14055
Sep 14055 13424
Qtr3 15580 13424
Oct 13424 13323
Nov 13323 13460
Dec 13460 12915
Qtr4 13424 12915
Year 14587 12915
1/26/10
Java Frame
package com.essbase.samples.japi;
import java.awt.*;
import java.awt.event.ActionEvent;
import java.awt.event.ActionListener;
import javax.swing.*;
import java.sql.*;
import com.essbase.api.base.*;
import com.essbase.api.session.*;
//import com.essbase.api.datasource.IEssCube;
//import com.essbase.api.datasource.IEssOlapFileObject;
import com.essbase.api.datasource.IEssOlapServer;
import com.essbase.api.domain.*;
public class HypFrame extends JFrame {
/**
*
*/
private JTextField tfname = new JTextField();
private JPasswordField tfpass = new JPasswordField();
private static final int FAILURE_CODE = 1;
void buildConstraints(GridBagConstraints gbc, int gx, int gy,
int gw, int gh, int wx, int wy) {
gbc.gridx = gx;
gbc.gridy = gy;
gbc.gridwidth = gw;
gbc.gridheight = gh;
gbc.weightx = wx;
gbc.weighty = wy;
}
void MainFrame()
{
// String title = (args.length == 0 ? "Main Frame" : args[0]);
JFrame frame= new JFrame("title");
//Container content = frame.getContentPane();
JPanel panel=new JPanel();
JTextArea jt= new JTextArea("Welcome Roseindia",15,29);
frame.add(panel);
//content.add(jt);
JScrollPane rightPane = new JScrollPane(jt);
panel.add(rightPane);
GridBagLayout gridbag = new GridBagLayout();
GridBagConstraints constraints = new GridBagConstraints();
buildConstraints(constraints, 0, 0, 1, 1, 10, 40);
constraints.fill = GridBagConstraints.NONE;
constraints.anchor = GridBagConstraints.EAST;
JButton btn1 = new JButton("button 1");
gridbag.setConstraints(btn1, constraints);
panel.add(btn1);
buildConstraints(constraints, 0, 1, 1, 1, 10, 40);
constraints.fill = GridBagConstraints.NONE;
constraints.anchor = GridBagConstraints.EAST;
JButton btn2 = new JButton("button 2");
gridbag.setConstraints(btn2, constraints);
panel.add(btn2);
buildConstraints(constraints, 0, 2, 1, 1, 10, 40);
constraints.fill = GridBagConstraints.NONE;
constraints.anchor = GridBagConstraints.EAST;
JButton btn3 = new JButton("button 3");
gridbag.setConstraints(btn3, constraints);
panel.add(btn3);
buildConstraints(constraints, 1, 0, 1, 1, 10, 40);
constraints.fill = GridBagConstraints.NONE;
constraints.anchor = GridBagConstraints.EAST;
JButton btn4 = new JButton("button 4");
gridbag.setConstraints(btn4, constraints);
panel.add(btn4);
buildConstraints(constraints, 1, 1, 1, 1, 10, 40);
constraints.fill = GridBagConstraints.NONE;
constraints.anchor = GridBagConstraints.EAST;
JButton btn5 = new JButton("button 5");
gridbag.setConstraints(btn5, constraints);
panel.add(btn5);
buildConstraints(constraints, 1, 2, 1, 1, 10, 40);
constraints.fill = GridBagConstraints.NONE;
constraints.anchor = GridBagConstraints.EAST;
JButton btn6 = new JButton("button 6");
gridbag.setConstraints(btn6, constraints);
panel.add(btn6);
frame.setSize(340,380);
frame.setVisible(true);
frame.setDefaultCloseOperation(JFrame.EXIT_ON_CLOSE);
}
public static void main(String[] arguments) {
HypFrame frame = new HypFrame();
frame.setVisible(true);
//.show();
}
void connectEssbase(){
int statusCode = 0; // will set this to FAILURE only if err/exception occurs.
IEssbase ess = null;
String s_provider ="http://localhost:13080/aps/JAPI";
String s_olapSvrName="localhost";
try {
// Create JAPI instance.
ess = IEssbase.Home.create(IEssbase.JAPI_VERSION);
// Sign On to the Provider
IEssDomain dom = ess.signOn(tfname.getText(), tfpass.getText(), false, null, s_provider);
IEssOlapServer olapSvr = dom.getOlapServer(s_olapSvrName);
olapSvr.connect();
System.out.println("Connection to Analyic server '" +olapSvr.getName()+ "' was successful.");
String apiVersion = ess.getApiVersion();
String apiVerDetail = ess.getApiVersionDetail();
System.out.println("API Version :"+apiVersion);
System.out.println("API Version Detail :"+apiVerDetail);
} catch (EssException x) {
System.err.println("Error: " + x.getMessage());
statusCode = FAILURE_CODE;
} finally {
// Sign off.
try {
if (ess != null && ess.isSignedOn() == true)
ess.signOff();
} catch (EssException x) {
System.err.println("Error: " + x.getMessage());
}
}
// Set status to failure only if exception occurs and do abnormal termination
// otherwise, it will by default terminate normally
if (statusCode == FAILURE_CODE) System.exit(FAILURE_CODE);
}
void connectOrcl(){
String data = "jdbc:odbc:orcl";
try {
Class.forName("sun.jdbc.odbc.JdbcOdbcDriver");
Connection conn = DriverManager.getConnection(data,
tfname.getText(), tfpass.getText());
Statement st = conn.createStatement();
System.out.println("Connected to orcl successfully!");
ResultSet rec = st.executeQuery(
"SELECT * " +
"FROM TBC.Family " +
"WHERE " +
"(FAMILYID='" + 1 + "') " +
"ORDER BY FAMILYID");
System.out.println("FIPS\tCOUNTRY\tYEAR\t" +
"ANTHRACITE PRODUCTION");
while(rec.next()) {
System.out.println(rec.getString(1) + "\t"
+ rec.getString(2) + "\t"
+ rec.getString(3) + "\t"
+ rec.getString(4));
}
st.close();
} catch (SQLException s) {
System.out.println("SQL Error: " + s.toString() + " "
+ s.getErrorCode() + " " + s.getSQLState());
} catch (Exception e) {
System.out.println("Error: " + e.toString()
+ e.getMessage());
}
}
public HypFrame() {
super("Username and Password");
setSize(290, 110);
GridBagLayout gridbag = new GridBagLayout();
GridBagConstraints constraints = new GridBagConstraints();
JPanel pane = new JPanel();
pane.setLayout(gridbag);
// Name label
buildConstraints(constraints, 0, 0, 1, 1, 10, 40);
constraints.fill = GridBagConstraints.NONE;
constraints.anchor = GridBagConstraints.EAST;
JLabel label1 = new JLabel("Username:", JLabel.LEFT);
gridbag.setConstraints(label1, constraints);
pane.add(label1);
// Name text field
buildConstraints(constraints, 1, 0, 1, 1, 90, 0);
constraints.fill = GridBagConstraints.HORIZONTAL;
// JTextField tfname = new JTextField();
gridbag.setConstraints(tfname, constraints);
pane.add(tfname);
// password label
buildConstraints(constraints, 0, 1, 1, 1, 0, 40);
constraints.fill = GridBagConstraints.NONE;
constraints.anchor = GridBagConstraints.EAST;
JLabel label2 = new JLabel("Password:", JLabel.LEFT);
gridbag.setConstraints(label2, constraints);
pane.add(label2);
// password text field
buildConstraints(constraints, 1, 1, 1, 1, 0, 0);
constraints.fill = GridBagConstraints.HORIZONTAL;
tfpass.setEchoChar('*');
gridbag.setConstraints(tfpass, constraints);
pane.add(tfpass);
// OK Button
buildConstraints(constraints, 0, 2, 2, 1, 0, 20);
constraints.fill = GridBagConstraints.NONE;
constraints.anchor = GridBagConstraints.CENTER;
JButton btnOk = new JButton("Ok");
gridbag.setConstraints(btnOk, constraints);
btnOk.addActionListener(new ButtonListener());
pane.add(btnOk);
setContentPane(pane);
}
class ButtonListener implements ActionListener {
ButtonListener() {
}
public void actionPerformed(ActionEvent e) {
if (e.getActionCommand().equals("Ok")) {
System.out.println("Button Ok has been clicked");
MainFrame();
connectOrcl();
connectEssbase();
}
}
}
}
1/24/10
Cannot start Essbase Server?
Problem: Cannot start Essbase Server?
The message is: Fatal Error: invalid item Index in Security File.
I can start the Essbase Service in Windows Service, and it shows "started", one second later, I refresh, it shows not started. I think it is about the Essbase.sec file corrupted, and I have rename essbase.bak to essbase.sec, still not working. I don't have an old backup for the essbase.sec. Should I reinstall Essbase? Please advise,thanks!
----------------
Solution 1(by GlennS):
If the security file is corrupted and you don't have a backup, you do not need to reinstall. You might lose all your security information howver.
First, rename the essbase.sec file
Then open a cmd window and enter Essbase.exe you should have Essbase start in the foreground and be asking for information. Enter the organization name
When it asks for the user, put in the admin id then the admin password. It should start Essbase, but none of the applications will be recognized.
Next start EAS and and right click oin the applications and select create application. One by One enter in the application names that are in the arborpath\Essbase\essbase\server\app folder.
It should re-add the applications.
Recreate any filters you had and if you are running shared services try to resync the users and groups.
--------------
Solution 2(by JohnGoodWin):
Just to add if you are using shared services,
have you tried renaming ESSBASE.BAK_startup to ESSBASE.sec to see if that works.
If that doesn't then ESSBASE.BAK_postUPM to ESSBASE.sec will be the essbase sec file just after essbase was converted to shared services mode.
1/10/10
What is the main develloping tool for design an Essbase?
Which one of the below or else is the main develloping tool to design an Essbase?
1. Essbase Studio Client Console
2. Essbase Integration Service Console
3. Essbase Administration Service Console
Essbase Stidio exists only in version 11, EAS can be used to modify a cube for sure, but in the beginning status to configure a cube, seems we should use another tool for the design of Essbase Cube. EIS is the tool to develope cube from RLDB. But after Essbase Studio appear, seems Essbase Studio is a more powerful tool to develop a CUBE, but I cannot find the method to create attriibute dimension and the place to associate attribute dimension with standard dimension using Essbase Studio Console?
Which tool is the most powerful to create a CUBE that include: alias, formula, attribute dim ans association, and UDA?
---------------
Answer(By JohnGoodWin):
Create a Hierarchy as usual and add your columns for your attribute dimenion, preview make sure your hierarchy is correct. Edit the hierarchy you want to map the attributes dimension to, add the attribute mapping to the hierarchy. (so attribute member mapped to dimension member)
(remember there needs to be a relational ship between the dimension members to the attribute members in your source)
There is an example of adding the mapping to a hierarchy on page 126 of EAS user guide (Multi-chain Hierarchy with Attribute Dimensions)
In the model select dimension > essbase properties > click the attribute member and then select the attribute settings. (this won't appear until you have correctly added the attribute mapping in the hierarchy set up)
------------------
Answer(By Cameron L):
To be totally pedantic, there are two tools that are missing:
1) EPMA -- Not my cup of tea, but can build a database and it supposedly works in v11, at least sometimes
2) If Business Rules is part of EAS, as is the Essbase calc script writer, you need to throw Calc Manager onto the list
I've never built an Essbase database through EPMA (although I have rapidly run away from EPMA/Planning more than once) but it's doable and apparently some like it. To me it is like liver and onions, but to each his own.
Which tool is the "best", or the main one? A case of horses for courses, I think. The project is going to dictate it, but my preference would be:
SQL driven for drill back and database creation (think ASO apps that need to get recreated) -- Studio if possible
Still SQL driven (I love load rules), prototypes (at least for me), BSO, Planning/BSO, calc scripts/HBRs -- EAS
---------------------
Answer(By Daniel):
EAS of course! EIS and Studio is gear towards ability to build a cube with drill back to a relational source. EAS is focus mainly on the cube itself and thus has all the advantages you described and therefore building things like attribute dimensions with ease.
1/7/10
Change the Database Name in Essbase Studio
Is there a way to change the database name in Essbase Studio, what I can see now once we have registered a database in Database Sources panel, we can't change the Database Name because it is always grayed out but the server name, user name and password can be changed.
Actually I have mentioned this issue to our team before starting development and they proposed me the schema that I can use, but suddenly our client did not agree with it that we have been using, and then our client asked us to use another schema, FYI we are using Oracle Database as the data source.
Can you guys here share how to manage this situation.
Thanks,
Rudy
---------------
For Essbase Studio, the configuration metadata are saved as CP_tablenames, look for the CP tables, and make proper database change for the database name.
1. Make a Oracle backup for the CP tables before you change the metadata so that you can get back in case if error
2. Change the CP_CONNECTION TABLE, NAME column
3. Change the CP_SOURCE table, column DNAME, for example, it is called TBC.Sales, change to NewDB.Sales
I am not sure if there are other table also need to be updated, anyway, when you update the DBname in the metadata level, everything should be consistent in all of the related tables. Here, I assume the new db has the same table names as the old db, if the new db has very different table names, recreating everything may be easier and has less risk.
Bob Wang
Subscribe to:
Posts (Atom)